Kitchen
How Long Does a Kitchen Remodel Take?
04.01.2025
04.01.2025
In This Article
Thinking about remodeling your kitchen? Congrats! You're about to embark on a journey filled with excitement, Pinterest boards, and a temporary love-hate relationship with takeout. But before you start picking out backsplash tile and dreaming of soft-close drawers, let's talk timelines. Because nothing kills renovation joy faster than thinking it'll take "just a few weeks" and finding yourself washing dishes in the bathtub two months later.
Understanding how long a kitchen remodel actually takes is essential—not just for your sanity but also for your schedule, your budget, and your relationships (trust us). Planning ahead and setting realistic expectations can make the difference between a smooth renovation and a stress-fueled standoff over cabinet hardware.
So, how long are we talking here? On average, a full kitchen remodel takes between 6 and 12 weeks once construction starts. That's after all the planning, designing, and permit-pulling. The process typically includes phases like demo, rough-in work (think plumbing and electrical), inspections, cabinetry installation, countertop templating and installation, flooring, painting, and final touches.
It's a lot—but it's also doable, especially when you know what's coming. So, let's break it all down, phase by phase, and help you avoid any mid-reno meltdowns.
Before anyone swings a sledgehammer or measures your cabinets for the fifth time, you’ve got to do some serious prep work. Think of this phase as stretching before a marathon—essential if you want to avoid pulling something (like your wallet or your patience).
First things first: what’s your “why”? Maybe your current kitchen is a tight galley with one lonely drawer, or maybe you’re just really into the idea of an island big enough to host Thanksgiving. Either way, now’s the time to list out your must-haves. Do you need more storage? Better lighting? A spot to stash your air fryer army?
Then, get honest about your style preferences. Are you a modern minimalist or more of a rustic-chic maximalist? Finally, the B-word: budget. Decide what you’re willing to spend—and add a cushion for the “oops” moments that are bound to pop up.
Take a hard look at what you’ve got. Is the layout working for you, or do you constantly bump elbows with your spouse while making toast? Understanding your kitchen’s flow—or lack thereof—will help you (and your designer or contractor) decide if a full reconfiguration is worth it or if you just need some smart tweaks.
Pro tip: Don’t underestimate the power of moving a fridge or knocking down a non-load-bearing wall. It can totally change how your space feels.
Yes, we’re bringing up the budget again—because it’s that important. Research average costs in your area and break things down into categories: cabinets, countertops, appliances, labor, finishes, and “just-in-case” money. Trust us, surprises happen.
The goal isn’t to scare yourself but to be informed. You want champagne results on a prosecco budget? Totally possible—you just need to know where to splurge and where to save.
Now for the fun part: scrolling through Instagram, pinning like a maniac, and saying things like, “I’m really into matte black fixtures right now.” Collect inspiration, but keep your actual space (and budget) in mind.
It’s easy to fall in love with a European farmhouse kitchen the size of a football field, but it's best to be realistic if you’re working with a New York City one-bedroom. Aim for inspiration, not delusion.
Unless you love chaos and raw veggies, make a plan for how you’ll survive without a kitchen. That might mean setting up a makeshift station in the dining room with a microwave and mini fridge or leaning heavily on your grill and coffee shop loyalty card.
Batch cook a few meals, stock up on paper plates, and mentally prepare to eat more takeout than usual. It’s a short-term inconvenience for a long-term glow-up—and hey, it might even make that first meal in your new kitchen feel like a five-star event.
Design a Home That’s Uniquely Yours
Block can help you achieve your renovation goals and bring your dream remodel to life with price assurance and expert support.
Get Started
You’ve dreamed. You’ve budgeted. You’ve watched enough HGTV to feel semi-qualified. But now it’s time to assemble your kitchen renovation dream team—and that means finding the right people for the job. Spoiler alert: Not all contractors are created equal. The good ones are worth their weight in quartz countertops, so let’s get into it.
Depending on how major your remodel is, you might need more than just a contractor. A general contractor (GC) is your project manager—they oversee the timeline and subcontractors and make sure everything runs smoothly. A kitchen designer helps make your space look great and function well (read: you won’t open your fridge into your dishwasher).
If you’re moving walls or making structural changes, an architect might be necessary, too. You don’t always need the whole trio, but knowing who does what will help you hire smart.
Hiring a contractor is kind of like dating—except this person will be in your house daily, asking where the water shut-off valve is. You want someone experienced, communicative, and trustworthy. Start by asking friends, neighbors, or your local hardware store for referrals.
Then, dig in: Are they licensed and insured? Can they provide references who aren’t just their cousin Steve? Don’t skip the due diligence here.
We know—it’s not the sexy part. But checking a contractor’s license and insurance protects you and your home. Ask for proof (a legit contractor won’t flinch), and call at least two recent clients to hear how the process went. Did they finish on time? Was the budget respected? Did the client survive?
A good contractor should be proud of their work—and have the receipts to prove it. Ask to see before-and-afters, especially of kitchens similar in size or style to yours. Bonus points if they’ve worked in your type of home before (hello, tricky brownstone plumbing).
Don’t just go with the first quote—get at least three estimates and compare them line by line. One contractor might include cleanup, while another adds it as a surprise “last invoice” item. Ask questions if anything’s unclear. This is your kitchen, not a mystery novel.
And remember: the lowest bid isn’t always the best. You’re looking for value, not just a bargain.
Good contractors are busy. If someone says they can start tomorrow, be wary. A short wait often means they’re in demand (a good sign). Discuss timelines up front—when they can start, how long the job should take, and what happens if there are delays.
Beware of contractors who want full payment up front, don’t offer a written contract, or seem vague about details. Other warning signs? Dodging your questions, refusing references, or texting only in emojis. Trust your gut. If it feels sketchy, it probably is.
Turn your renovation vision into reality
Get matched with trusted contractors and start your renovation today!
Find a Contractor
Welcome to the “Pinterest meets practicality” phase of your renovation. This is where your dream kitchen starts to take shape—on paper, at least. It’s also when you’ll make about a hundred decisions that the future you will thank for. Or question. Either way, it’s an essential stage, so let’s dive in.
At this point, you’re working closely with your contractor or designer (or both!) to figure out the best way to make your dream kitchen function like a well-oiled machine. This isn’t just about looks—it’s about flow. Where should the fridge go? Do you have enough prep space? Is there a path that doesn’t involve doing the limbo around the island? Your team will help you figure out what works in your space and how to bring it to life.
This is the fun part where you get to “see” your future kitchen before anyone picks up a hammer. Floor plans and 3D renderings help you visualize things like how wide your walkways will be, where outlets will go, and whether that bold tile you’ve been eyeing is actually the vibe. It’s also when you’ll catch layout quirks before they become expensive fixes.
Time to channel your inner interior designer. You’ll be selecting cabinets (style and color), countertops (marble, quartz, maybe something wild like concrete), flooring (tile? wood? both?), backsplash, hardware, and lighting. Oh, and appliances. It’s a lot, but making these decisions now will save you from holding up the project later. Plus, this is where your kitchen’s personality starts to shine—will it be sleek and modern, warm and cozy, or full-on maximalist with a disco ball over the sink?
Repeat after us: indecision is the enemy of progress. If you can, lock in your big decisions early—especially anything that requires ordering, like custom cabinets or imported tile. Delays in materials = delays in the whole renovation. It’s totally normal to waffle a bit, but your contractor can’t install a phantom backsplash, so try to commit when possible. Think of it as setting future-you up for success (and fewer dinner-table meltdowns in the meantime).
Ah yes, the kitchen triangle—a time-tested concept that keeps your sink, stove, and fridge in a happy, efficient relationship. But it doesn’t stop there. Think about how you use your kitchen: Do you bake often? Store 47 types of cereal? Hate overhead lighting? Your layout should support your habits. Add under-cabinet lights where you chop, drawers for snacks at kid height, and pull-outs for everything else. Good design isn’t just pretty—it’s smart..jpg?width=742&height=462&name=King%20-%20Final%20Kitchen%20(1).jpg)
Welcome to the “hurry up and wait” phase of your kitchen renovation. While it might feel like nothing is happening, this stage is quietly crucial. Permits are being filed, materials are being ordered, and the foundation (figuratively and sometimes literally) is being set for a smooth build. It’s a little less exciting than picking out backsplash tile but a whole lot more important than it seems.
Depending on what your remodel involves, you’ll likely need a handful of permits—think electrical, plumbing, and possibly structural if you’re removing walls or changing the layout. These permits exist to ensure everything’s up to code and safe (and to give your contractor just a bit of paperwork-induced stress).
Luckily, if you’ve hired a licensed contractor or architect, they’ll usually handle this for you. Your job? Be patient. And maybe resist the urge to start a demo with a hammer just because “it looks fun.”
Ah, the joys of municipal bureaucracy. Working with your local building department can be... an exercise in zen. Wait times vary wildly depending on where you live—some cities approve permits in days, others take weeks.
The best thing you can do is stay flexible and trust your contractor to follow up. This isn’t the time to DIY or cut corners. Skipping permits can lead to fines or having to rip out finished work—neither of which pairs well with your renovation budget or blood pressure.
Here’s where the real strategy comes in: knowing when to order what. Custom cabinets? They can take 8–12 weeks. That dreamy farmhouse sink you fell in love with? Backordered until who-knows-when. Even appliances—yes, the basic ones—can have surprisingly long lead times these days.
Moral of the story: the sooner you decide, the sooner your team can order, and the less likely you are to find yourself cooking on a camp stove three months longer than expected. Off-the-shelf options can help speed things along, but if you’re set on that handcrafted Moroccan tile, just plan ahead and build in a buffer.
This is the time to get your ducks in a row. Cabinets, appliances, sinks, faucets, light fixtures—get them ordered now so they’re ready when your contractor is. Waiting until demo is done to start shopping is a classic mistake and a one-way ticket to renovation limbo.
It might feel odd to commit to everything before a single wall comes down, but trust us—it’s the secret to staying on schedule. Plus, there’s something deeply satisfying about watching all the boxes arrive and imagining your new kitchen slowly coming to life inside them.
Next up: the noise, the dust, and the magic—construction begins!
Renovate with confidence every step of the way
Step 1: Personalize Your Renovation Plan
Step 2: Receive Quotes from Trusted Contractors
Step 3: Let Us Handle the Project Details

Ah, demo day. It’s loud, dusty, and oddly satisfying. Whether you’re channeling your inner HGTV star or quietly watching the pros rip things apart, demolition is the moment your old kitchen officially becomes the past. But before the first cabinet comes crashing down, a little prep work is involved—and a few surprises might pop up along the way.
Before anything gets smashed, your renovation team will (hopefully!) take steps to protect the rest of your home. This includes putting down floor coverings, sealing off the kitchen with plastic sheeting, and setting up dust control measures—because drywall dust has a sneaky way of finding its way into every sock drawer.
Also, safety matters. Demo may look like chaos, but it should be organized chaos. Hard hats, gloves, goggles, and proper tools are key. No sledgehammering in flip-flops, please.
Depending on your renovation goals, demolition might be a dramatic full-gut job (walls, floors, cabinets—bye!) or a more selective refresh. Keeping your layout the same? You may only remove cabinets, counters, and appliances. Reconfiguring everything? Down to the studs it goes.
Either way, it’s fast. Demo usually only takes a few days, which is great for momentum. Just don’t blink—you might miss it.
Here’s where the “fun” surprises come in. Once the walls and floors are opened up, your contractor might find things you weren’t expecting—like old water damage, mold, outdated electrical, or questionable DIY fixes from a previous owner (no, duct tape is not a plumbing solution).
These discoveries can slow things down and affect the budget, but it’s much better to deal with them now than cover them up and hope for the best. Think of it as your house finally telling you all its secrets.
Demo creates a lot of debris. Old cabinets, broken tile, busted drywall—it all has to go somewhere. A good contractor will coordinate dumpster rentals and make sure the mess doesn’t sit around longer than necessary. If you're DIY-ing parts of the demo, check with your town about disposal rules (spoiler: you can’t just toss a countertop in your regular trash bin).
Pro tip: If you’re replacing items that are still in good condition—like cabinets or appliances—consider donating them to a local reuse center like Habitat for Humanity’s ReStore. It keeps them out of the landfill and can help someone else create their dream kitchen on a budget.
With the old kitchen out of the way, it’s finally time to start building the new one. Say goodbye to the '90s oak cabinets and hello to the blank canvas of your future dream space.
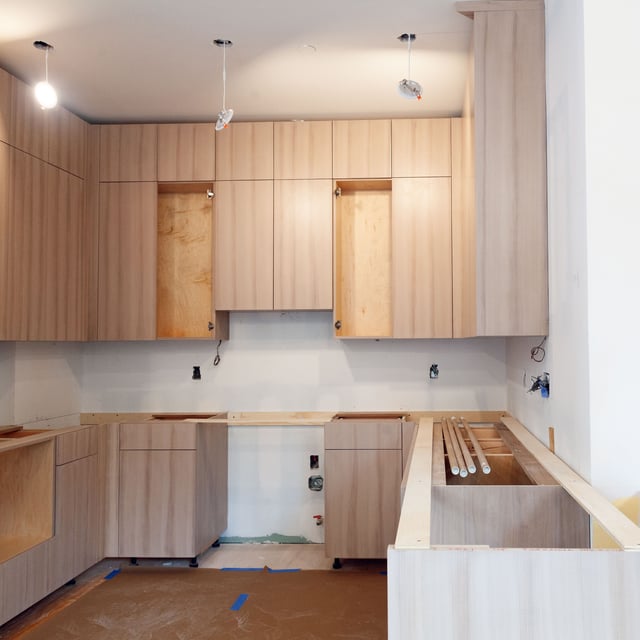
Now that the dust has (literally) settled from demolition, it’s time to rebuild—slowly, carefully, and with a whole lot of wires and pipes. This phase might not look exciting (no shiny finishes yet!), but it’s absolutely essential. Think of it as the behind-the-scenes magic that makes your kitchen work like a dream—and keeps your outlets from blowing a fuse when you plug in your espresso machine.
If you’re changing the layout—say, opening up a wall to your dining room or stealing a few feet from a pantry—this is when the framing happens. New walls are built, doorways moved, and spaces start to take on their new shape. It’s the first time you’ll really get a feel for how your future kitchen will flow (aka: no more corner cabinet traffic jams).
It might just be some two-by-fours and construction dust for now, but trust us, this is the skeleton of your dream space coming to life.
Once the framing’s done, it’s time to bring in the pros—the plumber, electrician, and HVAC technician. This is when pipes are run for your new sink, gas lines go in for the range (if you’re going gas), and electrical wires are set for all your lighting, outlets, and appliances.
Pro tip: Now’s the time to think through lighting placement and outlet locations. Want a dedicated espresso bar? Make sure you’ve got power where you need it. Installing a pot filler over the stove? This is when the plumbing gets routed.
It’s not glamorous, but this work makes the rest of your kitchen function, so speak up if you’ve got special requests.
Before anyone closes up the walls, your renovation has to pass a round of inspections. These vary by location but generally cover plumbing, electrical, and framing. A city inspector will swing by to make sure everything’s up to code and safely installed.
While this can slow things down a bit (inspectors work on their timeline, not yours), it’s a key safety step—and helps avoid bigger issues later. So yes, it’s a little nerve-wracking, but it's also a milestone: you're officially halfway there!
If your kitchen’s exterior walls were opened up, or if you're in an older home without great insulation, now’s the time to make sure things are cozy. Insulation gets installed in the walls to help regulate temperature and reduce noise (which comes in handy when your blender is going full turbo).
It’s a small step, but one that pays off every time you sip coffee in a warm kitchen on a cold morning.
Next up? Drywall, cabinets, and the part where your kitchen starts actually to look like a kitchen. Hang tight—the fun is just beginning.
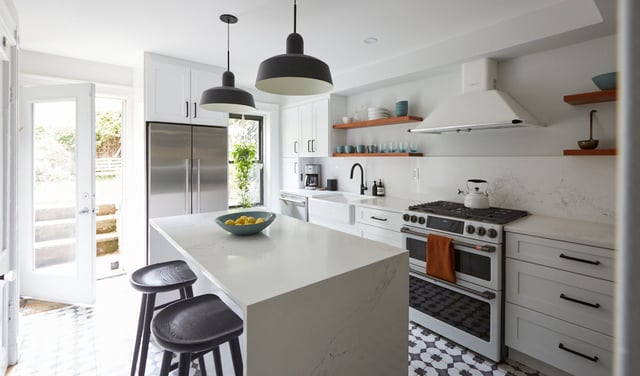
Cue the dramatic makeover music—your kitchen is finally starting to look like, well, a kitchen. This is the phase where all those boxes that have been sitting in your hallway (or garage or living room) get unpacked and installed. Cabinets go in, counters are placed, lights are hung, and you’ll start to see your vision come to life piece by piece. It’s basically renovation Christmas.
First up: cabinets. These are the backbone of your kitchen, both structurally and stylistically. The installation can take a few days, depending on how custom or complex things are. And yes, they really do check every corner with a level about six times—it matters.
Once your cabinets are secured, it’s countertop time. These are usually templated after the cabinets are installed (precision is key), so there may be a little lag while the fabrication happens. But when that slab of quartz, marble, or butcher block finally lands—chef’s kiss.
Next comes the detail work, and it’s where your kitchen really starts to shine. Flooring goes down—whether it's tile, wood, or something in between—and suddenly, the room feels grounded. Then, the backsplash goes up, turning a blank wall into a statement piece. This is where your personality really pops: bold pattern? Sleek subway tile? Tiny hand-painted lemons? Go wild.
Lighting is the cherry on top. Pendants, sconces, under-cabinet strips—all of it comes together to make your kitchen feel finished and functional. Just don’t forget the dimmers (because mood lighting is real, even when you're reheating leftovers).
This is the point where your kitchen transforms from pretty to practical. Your shiny new appliances finally arrive—no more pretending the mini fridge in the basement is “fine for now.” The range gets slid into place, the fridge hums to life, and you may feel an overwhelming desire to cook something… or at least plug in the air fryer.
Everything must be carefully hooked up—gas lines, water lines, electrical connections—so leave this part to the pros. You’re close now, and no one wants a leaky dishwasher at the finish line.
Behind the scenes, this phase is a bit like juggling flaming knives. You've got cabinet installers, countertop fabricators, electricians, plumbers, and tile guys—and they all need to work in a specific order on a tight schedule.
If you’ve got a general contractor, they’ll manage the chaos and keep everyone in line. If you're handling things yourself, just know that communication and flexibility are key. Things may shift, but keep your eye on the prize: a fully finished, functional kitchen you’ll love.
Almost there! Next up: finishing touches and the big “ta-da.” You’re about to cross the renovation finish line.
You made it! Well… almost. Your kitchen looks complete, the appliances are in, and you’ve already mentally planned your first dinner party. But before you pop the champagne, there’s one final phase—and trust us, it’s worth doing right. These last steps take your space from “new construction zone” to “gorgeous, lived-in dream kitchen.” It’s all about the polish.
This is when the details come into play—aka, the stuff that makes your kitchen feel finished. Walls get painted (finally covering up those accidental pencil marks and drywall patches), trim is installed around windows and doors, and your cabinet doors get their hardware.
Don’t underestimate how exciting it is to choose knobs and pulls. Those tiny pieces of metal? They're the jewelry of your kitchen. Are you going glam with brushed gold, classic with matte black, or staying cool with stainless? Whatever you pick, this is the moment style meets function, and you start to realize your design vision fully.
Now, it’s time for the official walkthrough with your contractor. You’ll go over everything, big and small—checking that the outlets work, the cabinets open properly, and the faucet doesn’t spray you in the face. This is your chance to point out anything that looks off, needs adjusting, or was missed entirely.
The list of final fixes is called the “punch list.” It might include paint touch-ups, a misaligned drawer, or a wobbly light fixture. No detail is too small—it’s your kitchen, and it should be perfect (or at least very, very close).
Once the punch list is made, your contractor will send in the crew for one last round of work. Touch-ups get handled quickly, paint gets evened out, and any minor issues are corrected. After that, it’s cleaning time.
And we’re not talking about a quick vacuum—we’re talking about a real, professional clean. Dust is removed from every surface (yes, even inside the cabinets), floors are washed, windows are wiped, and your kitchen finally feels ready to be used—without worrying about stepping on a rogue nail or wiping down every drawer.
The final step? You sign off on the project saying, “Yes, I love my kitchen, and it’s done—hallelujah!” Your contractor will also hand over warranty info for appliances, materials, and workmanship. Keep it all in one place so you’re not frantically searching for that faucet warranty if something drips six months from now.
Celebrate this moment—you made it through the ups, downs, dust, delays, and design decisions. Your dream kitchen is ready to shine. So go ahead: host the dinner party, make that complicated recipe, or just toast some bread and admire the view.
Need a little post-reno maintenance checklist next?

The dust has cleared, the tools are gone, and you’re no longer living with a team of contractors. Welcome to the blissful post-renovation phase—also known as “finally enjoying your kitchen without stepping over extension cords.” But before you kick back and admire your gorgeous new space with a celebratory snack, there are a few simple things you can do to keep everything looking and working its best for years to come.
Your new kitchen may look showroom-perfect, but it still needs some TLC. Different materials require different care routines—so no, you can’t just spray everything with an all-purpose cleaner and hope for the best. Marble countertops, for example, can stain if you stare at them too hard (kidding… sort of), while butcher block loves a good oiling now and then.
Appliances are another area where a little maintenance goes a long way. Clean your oven filter. Wipe down your stainless steel with the grain. Learn how to lovingly speak the language of your induction cooktop. This isn’t about being high-maintenance—it’s about protecting your investment. You spent time and money on this kitchen. Let’s keep it fabulous.
Remember that folder (or email) your contractor gave you at the end with all the warranty info? Don’t toss it in a junk drawer next to the coupons you’ll never use. Read through it. You’d be surprised how many things are covered for a year—or even longer—if something stops working.
Keep track of maintenance recommendations, too. Some manufacturers suggest annual servicing, filter replacements, or seal reapplications to keep things under warranty. It might feel a little extra, but future-you will thank you when your appliances are still humming along perfectly five years from now.
Pro tip: set calendar reminders for maintenance tasks now so you don’t forget. Yes, you could write it on a sticky note and stick it to the fridge… but we all know how that ends.
Maybe you’ll want to add shelves down the line. Maybe you notice a teeny paint chip a month in. Or maybe your neighbor stops by and says, “Whoa, who did your kitchen?” Whatever the case, keep your contractor’s info handy—along with details about your paint color, grout type, cabinet finish, and more.
Create a quick kitchen cheat sheet with all those helpful details. You’ll save yourself a ton of time (and color-matching headaches) later. Plus, if something ever needs a quick touch-up, you’ll already know who to call.
Now go ahead—fill your cabinets, cook something amazing, and bask in the joy of your freshly renovated space. You made it through the reno rollercoaster, and now? It’s time to enjoy the ride.
Timeline overview by project type

Let’s be honest—when it comes to kitchen renovations, the phrase “right on schedule” is about as rare as a quiet jackhammer. While most remodels aim for that sweet 6–12-week window, a few factors can stretch that timeline, like pizza dough on a humid day. Some are within your control. Others… not so much. The good news? Knowing what might slow things down helps you plan smarter and stress less.
Custom cabinets and made-to-order finishes are stunning, no doubt. But they also tend to come with longer lead times. That dreamy matte navy cabinet set with brass inlays? Probably not sitting in a warehouse somewhere, ready to ship.
Prefab or semi-custom materials, on the other hand, are often available quicker and can still look fantastic. It’s all about balance: if you’ve got your heart set on custom, build in extra time. If you’re on a tighter schedule, consider ready-made options that still hit the aesthetic mark.
The best contractors are often booked out—because they’re good. So, if yours says they can start next week, double-check they’re legit. A busy contractor with a solid crew is a good sign, even if it means waiting a few weeks to get on their schedule.
Also, ask about their team size. A larger crew might mean faster progress, while a solo contractor (or a small team) may need more time to get everything done. Either way, clarity upfront helps set realistic expectations.
If renovation delays had a mascot, it would be indecision. Changing your mind mid-project—on layout, materials, and finishes—adds time (and usually cost). Known in the biz as "change orders," these midstream swaps require new plans, new parts, and usually some reshuffling of the schedule.
So yes, you’re totally allowed to change your backsplash if it doesn’t spark joy—but try to make as many decisions as possible during the design phase. Your timeline (and contractor) will thank you.
Ah, permits. The necessary evil of any serious renovation. They ensure your kitchen is safe, legal, and up to code—but they also involve paperwork, waiting periods, and scheduling city inspectors who may or may not be running behind.
This part is largely out of your control, especially in areas with a backlog. The best move? Apply early, stay organized, and roll with it. A little patience now saves a lot of headaches later.
If your remodel involves anything exterior—like expanding the kitchen or moving walls that connect to the outdoors—weather can absolutely impact progress. Rain, snow, or extreme cold can pause framing, roofing, and other structural work.
Indoor-only remodel? You’re mostly in the clear. But if mother nature is involved, keep an umbrella handy—for both your head and your schedule.
In the end, no renovation goes perfectly to plan—but with a little flexibility and a good sense of humor, you’ll get there. And it’ll be so worth it.
Staying on schedule during a renovation is kind of like keeping a toddler clean during snack time—possible, but it takes strategy. While some delays are out of your control (we’re looking at you, backordered faucet), others can be dodged with a little planning, a lot of communication, and the ability to say, “Yep, let’s go with that one.” Here’s how to keep your remodel running smoothly—without losing your mind or your lunch break.
It’s tempting to wait on a few decisions—like which exact shade of white your cabinets should be or if you really want that statement tile. But indecision during a reno is equivalent to throwing a wrench in a very expensive, loud machine.
Lock in your major selections—cabinets, countertops, fixtures, flooring—before demo starts. That way, everything can be ordered in advance, and your contractor isn’t left waiting (or improvising). It also helps avoid the “surprise; it’s back ordered until next spring” moment that can derail even the best-laid plans.
Think of your contractor as your renovation co-pilot. The more openly you communicate, the smoother the journey. Check in regularly, ask questions, and speak up early if something feels off. It’s much easier to course-correct in week two than to fix a misunderstanding when your backsplash is halfway installed upside down.
Clear communication = fewer surprises and more high-fives. Don’t ghost your contractor, and don’t be afraid to ask for updates. They’re busy, but this is your kitchen, and it’s okay to be involved.
Scope creep is that sneaky temptation to keep adding “just one more thing.” It starts with upgrading the sink; then, suddenly, you’re knocking down walls, adding a skylight, and building a wine cellar. Fun? Sure. Timeline-friendly? Not even close.
Stick to the original plan as much as possible. If inspiration strikes mid-reno (hello, Pinterest rabbit hole), weigh the cost and timeline before jumping in. A few tweaks are normal, but big changes = big delays. Be the hero your schedule needs: decisive, focused, and strong in the face of trendy temptation.
Here’s the golden rule of renovations: expect the unexpected. Pipes may need replacing. Permits might take longer. The cabinet installer could catch the flu. It happens.
That’s why every renovation should have a contingency buffer in time and budget. Aim for 10–20% extra in both categories. That way, if something comes up (and it probably will), you’re not panicking—you’re prepared. And if everything goes smoothly? You finish early and maybe even have a little cash left over for celebratory tacos.
With the right mindset and a few smart moves, staying on schedule is possible. Plan ahead, stay in sync with your team, and don’t forget to breathe. Your dream kitchen is just around the corner.

Renovate confidently with Block
Easily compare quotes from top quality contractors, and get peace of mind with warranty & price protections.
Kitchen
How Long Does a Kitchen Remodel Take?
04.01.2025
Design
The Ultimate Guide to Kitchen Tiles with Tile Options
04.01.2025
Cost
How Much Does a Home Renovation Cost in the Bay Area?
03.13.2025
Finance
Ultimate Guide to Kitchen Remodel Financing in Boston
03.13.2025
Remodeling
Ultimate Guide to Kitchen Remodel Financing in 2025
03.13.2025